

Saving seeds for home gardening
If you come to my house, you are more than likely to find a plate or a saucer on our fireplace, with some seeds drying on it. I often wonder what visitors to our home think we are doing. Who are these people, with their plates of dried out husks all over the place?
I save seeds for future planting in my garden because it’s fun, it saves money, and it contributes in a very small way to plant biodiversity.
Saving seeds is very easy. I have learned to do it over time by reading about how to save seeds from different plants, watching YouTube videos, and testing it out myself. For some plants it is very intuitive, and you don’t need a guide. For others, it is helpful to read about the plant and the way seeds are reproduced in nature.
I save seeds in two ways: by allowing the plant to self-seed in my garden, and by actively sourcing and saving seeds for replanting later.
Self-seeding (a.k.a the lazy way)
Only do this a) if you have the space (I do); and b) for plants you don’t mind spreading around the place. I mostly allow plants like herbs and some flowers to self-seed. But a word of warning before you do this: make sure that you know for sure the plant will self-seed true-to-type the following year (i.e that it is an heirloom variety). I made this mistake two years ago with a variety of Cosmos (an annual flowering plant) that I believed would self-seed prolifically. The first year, the plants were spectacular, and I really wanted a second crop from the seed heads that grew very easily from the spent flowers. I sprinkled them far and wide in my garden. Sure enough, the plants regrew the following year. However, they produced only one or two flowering heads, and are now an annoying weed in my garden. I am still pulling them out. The lesson here is: really know your plant before you go ahead and allow it to self-seed in your garden. Plants are biologically hard-wired to try to reproduce, even when humans have bred them not to be able to do so. You may not get what you want.


The plants I allow to self-seed are: parsley (both Italian and curly), violas and pansies, lettuces, lamb’s ear, sweet peas, nigella, and white alyssum.
Parsley is a good one to try first, as it goes to seed at the end of its two-year lifespan, and is not happy to be transplanted. When it does go to seed, it will often grow to an enormous size, so you will need to be ready for this. Choose a plant that is in as unobtrusive a spot in your garden as possible, and let it bloom and the seeds form.
Allowing plants to go to seed is a lesson in patience. You have to accept that the plant will look sprawly and overgrown for some time. However, you will be rewarded by beneficial insects (in my garden, primarily foraging bees and ladybugs) that love to visit your herbaceous flowers.
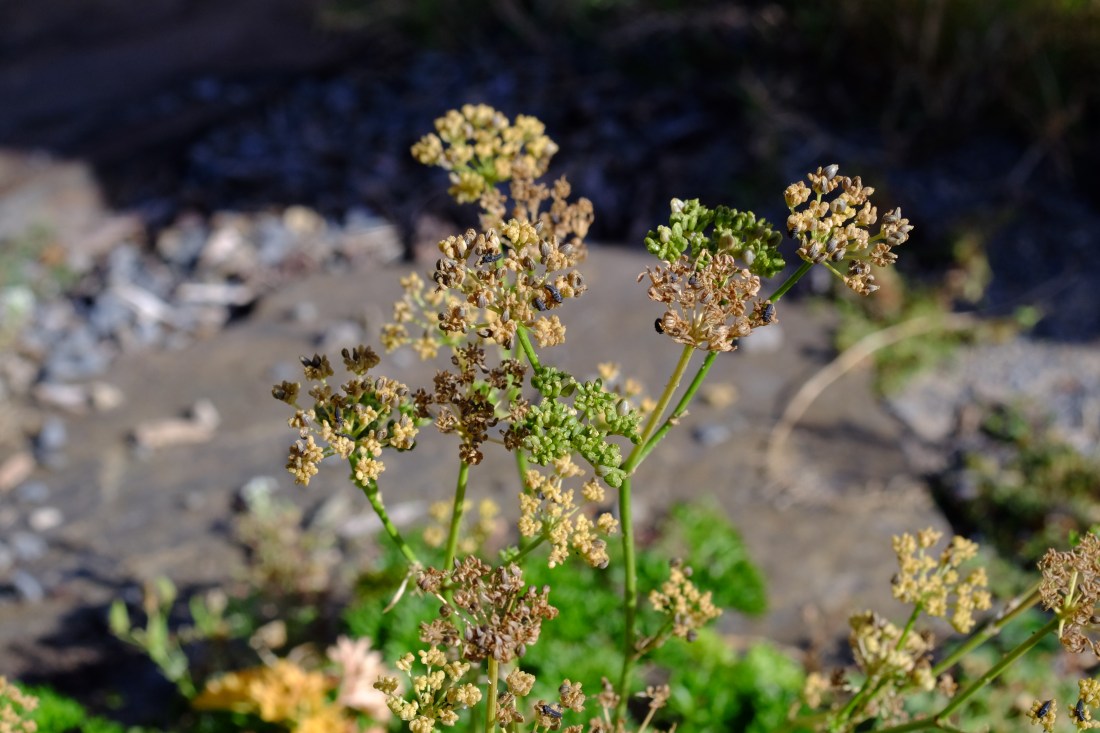
After several months (yep, months!) the parsley seed heads will dry and you can either collect them and save them in a jar for future planting, or sprinkle them around your garden. It is likely that they will already have spread by wind or birds, and you will start to find little parsley plants popping up at odd spots throughout your garden. Personally, I love this look and am happy to let them grow where they will. However, you can transplant them when they are young. Do it before the parsley has had time to develop its long taproot, or it will be grumpy and will not do well. One thing I enjoy about having so many herbs all around the place is that friends and family know that we always have herbs free for the taking. If they want a bunch of parsley for dinner, they can just grab some from our garden.
This is also the case with Lamb’s Ear, which really struggles to be transplanted. I have only had success in a few cases. It self-seeds readily, but hates to be moved. I don’t mind letting it go to flower and seed though, as the tall pink flower spikes atop the soft grey foliage are stunning and provide a point of difference in my garden. The bees also love these.


Alyssum and violas are very easy to self-seed. Since I planted a punnet of white alyssum three years ago I have never needed to replant. I let it go along its own way, and I now find the flowers in cracks, between other plants, and in my grass. Again, I don’t mind this, but if you want a neater garden you will need to plant it in a pot. For a less invasive variety, plant the purple variety. In my experience it does not self-seed readily at all (kind of annoying from my point of view, but good if you do not want a spreading variety).
Sweet peas were an unintentional self-seeder. In 2016 I planted Sweet Pea Matucana, a purple and pink heirloom sweet pea that grows very strongly and is very sweetly scented. Due to time constraints, I let it develop a lot of seed heads before I removed the spent plants. I deliberately saved some to plant the following year, but a full stand of flowers grew without my help last year (I also planted some in a different spot). I saved more seeds from that crop and this year I will plant them again, along with the new seeds for Sweet Pea America I just purchased. Sweet peas are my favourite flower, so I am more than happy to have them reappear annually without any effort on my part.
Saving seeds
I save seeds from plants that have been highly prolific, or that are especially tasty. Some of my efforts at saving seeds have been highly experimental and very successful; other efforts should have worked but were dismal failures. It is very much a trial and error process. In terms of saving time, it is not a hobby for that. I could buy a packet of seeds or a punnet of seedlings and be done with it.
Tomatoes
Saving tomato seeds is a fiddly business. If you have an heirloom tomato that you want to grow again next year, wait until you have a nice, ripe specimen. Fill a cup or small jar with water, and scoop the seeds into the cup. Let the tomato seeds sit in the cup overnight. They will ferment slightly. Strain in a fine sieve, ensuring you remove all pulp from around the seeds. Dry on a plate lined with paper towel until completely dry. They will stick to the paper, but they are easily removed. Store in a labelled jar in a dark place.
Pumpkins
Can you say ‘easy’? Pumpkins are the gift that keeps on giving, provided you have the room to grow them. Easy to grow, easy to save seeds, easy to eat. There is nothing about pumpkins to dislike. I saved my first lot of pumpkin seeds from a Kent pumpkin bought on sale at the supermarket, and it produced perfect replicas of that original pumpkin. In fact, it’s hard to keep a pumpkin seed down. Try composting them – you will just end up with pumpkin plants down the track. We currently have about ten pumpkin plants in our garden, and we only planted four of them. The rest are self-seeded butternuts from our compost. They are also producing beautiful, fat butternuts. I see pumpkin soup, pumpkin dal, and pumpkin scones in our future.
To save pumpkin seeds, just scoop them out of a fully ripe pumpkin, give them a rinse to remove the pulp, and dry them on a plate. Too easy.

Zucchini
I have to be honest: my success rate saving zucchini seeds is low. I find the seeds to be flimsier than pumpkins, and they do not dry as well. The process for drying them is the same as pumpkins, but the result is not as good (for me). I will keep trying but so far, not great.

Capsicums and Chillies
These are as easy as pumpkins. Let the capsicum or chilli ripen on the vine until red (or yellow or black, depending on your variety). Cut open and remove the seeds. Dry on a plate, and store in a jar in a dark place. I have had good success with both chillies and capsicums.
Beans and peas
These are very simple. Toward the end of the season, when the bean or pea vines are almost at the end of their natural cycle, let a couple of pea pods or beans grow larger than you normally would if you were planning to eat them. Let the pods dry on the vine for as long as possible. Give them a shake: you should hear the little peas and beans inside rattle. If you are worried about mildew, gently remove from the plant and bring inside to dry. Voila! Bean or pea seeds! When completely dry, remove from the pods and store in a jar until next season. I have saved both beans and peas this way with success. They can be prone to fungal diseases, but I have not had this problem.
Eggplant
This is kind of a pain, because you have to sacrifice an eggplant. To get an eggplant to the point that it has set seeds, you need to let it get to that old and bitter stage, when they are not really worth eating. Some people recommend pulsing your ancient eggplant in a food processor with water until the seeds rise to the top. I have not found that to be necessary. When they have reached the seedy stage, the seeds more or less fall out as you cut it up. Save the seeds you want and then compost the rest.
Lettuce
A lettuce sets seeds in a similar way to a thistle or other weedy plant you have seen in your garden. It has yellowish flowers that then sets a woolly seed head. These need to be allowed to dry out to brownish small seeds. The seeds are very fine, so when it reaches the dry stage, cover the head with a brown paper bag to catch the seeds.

In the end, much of seed saving is about trial and error. Try saving some of the simpler seeds, such as pumpkin, beans, and peas. I have had most success with capsicum and chillies, and pumpkin. I have yet to try silverbeet or any of the greens (except lettuce), carrots or root vegetables, brassicas, or sweetcorn. One day, I hope to be self-sufficient in seeds and have no need to buy seeds from a seed company.