As I have already mentioned, this Summer, pumpkins will feature heavily in my patch.
However, these will not be the only veggies I will be growing in my garden. I have tried not to go overboard buying seeds this Season (a bad habit of mine), and have also tried really hard to only buy seeds for plants I really want to eat. I have been given to garden experimentation in the past, but this season I really wanted to focus on giving up now my increasingly precious garden space to veggies that everyone in the family will really want to eat and that grows well in my microclimate. So I’m farewelling okra, even though we quite enjoy it, because it is just not productive enough in my garden to give it garden space. I’ll buy a bag of frozen okra if we want some.
Aside from the pumpkins (Anna Swartz, QueenslandBlue, Butternut, Buttercup, Jack Be Little, and Galeux D’Eysines), I will grow climbing beans, a melon or two, cucumbers, zucchini/squash, tomatoes, eggplant, capsicum, basil, and chillies. The varieties are:
Eggplant: Rosa Bianca, Ping Tung Long, Listada de Gandia, Tsakoniki, Caspar;
These will be planted in the patch (pumpkins, zucchini, melons, beans), in containers (chillies, capsicum) and in the greenhouse (the rest). I have already planted the tomatoes and eggplant seeds in the greenhouse so they get an early start. As they grow into seedlings I will pot them on into larger pots so they develop stronger root systems before planting out in large wicking beds in the greenhouse. I find that even in the hottest of our Summer days, eggplants, cucumbers, and tomatoes do better in the greenhouse than in the patch – in fact, before we had the greenhouse I could never grow a single cucumber. My mother, who lives about half an hour away on the Adelaide Plains, is the queen of cucumber growing – I could not work out why I couldn’t grow cucumbers successfully.
Part of the issue is our elevation. We live on a hilltop at an elevation about 200m above sea level, compared to the Adelaide Plains (elevation about 50m above sea level). While our elevation does not compare to the hills and mountains we saw on a recent trip to New Zealand, it does make a difference. Family members living on the Plains report ripe fruit on tomato bushes and mulberry trees at least six weeks before our trees even show immature fruit. My cousin, who lives about an hour and a half north of us, is already picking asparagus, while mine is yet to poke its head up (my asparagus is also not planted in the best spot – I will need to move it in Autumn). My eldest daughter, who lives 15 minutes away downhill, has ripe fruit on her apricot tree several weeks before we do on ours. Our backyard microclimate is quite a lot cooler than her sunny backyard just 15 minutes away.
Understanding the impact of microclimates can make such a difference to growing success in your patch. I can’t grow pumpkins in the greenhouse (too humid, not enough space), but being fortunate enough to have a greenhouse means that I can grow other fruiting vines that need an extra boost of warmth.
What are you planning to grow in your veggie patch this Summer? Let me know in the comments!
The blog, like my garden, has mostly lain fallow for the past few months. I had a major project deadline to reach, which meant I worked 12 weeks worth of hours in 4 weeks. When I finished the project I decided to take a few days off, and predictably fell ill with the plague a nasty cold. All my gardening plans fell by the wayside while I languished in bed, cursing.
But resting makes time for planning. In between watching old episodes of Bones and reading delightfully silly Sookie Stackhouse novels, I also did some planning for my Spring and Summer veggie patch.
You might recall that I decided to grow green manures and legumes in my veggie patch over Autumn and Winter, letting my soil rest for the whole cool season. This was after my disastrous ‘no dig’ experiment, which left me with a rocky, dry, rootbound patch of sad looking soil.
Planning for Water
I am hoping that after this season of rest, my soil will be much happier and willing to take on some heavy producing plants. Think pumpkins, pumpkins, pumpkins. Last season was incredibly disappointing for pumpkins, which I mostly put down to the terrible weather. However, I do not believe that was the only reason. I think that the dodgy soil and my watering regimen was also a problem. I hope that this season’s soil repair efforts will make a big difference, but I have also decided that it is well past time to give up my old-school watering system (hose and sprinkler). This is just not serving me well anymore, partly because I am getting older, and partly because it takes way too much time (the part-time gardener’s most limited resource), and most of all because it just not efficient. This last year was the driest on record. My water bill for the Summer quarter was our highest on record. Something has to give.
From my sickbed I did some desktop research and contacted the highest rated and most consistently well-reviewed irrigation company near me, and asked them to quote. They contacted me five minutes later, and I organised for them to come out a few days later, when I was not so cooty-filled. They said they were not worried about my cooties and came out two days ago. While I sat in the weak sunshine feeling sorry for my snotty self, they measured and took photos, and then sent me an incredible quote (think about 25% of what I was expecting to pay) for an irrigation system for the entire veggie bed and all my backyard fruit trees. They are coming to install next week. If they do a good job, I will ask them to quote for the front yard fruit trees as well. If this system shaves down my Summer water bill and saves me time on watering, it will be money very well spent. If it improves my pumpkin growing experience, it will be worth its weight in…pumpkins. Which are quite heavy.
Last year was a singular disappointment in the pumpkin department. I refuse to live that disappointment again. That is the main reason for investing in the irrigation system. My brother had a spectacular melon patch last year, and he had installed a watering system. Pumpkins and watermelons are cousins, so I figured it was time to stop being a cheap stubborn old biddy and just do it already.
If you build it, they will come. Pumpkins, that is.
Planning for Spring
Spring is a great time to grow a quick cheeky crop of greens
The idea that we have four seasons that correspond to European seasons (but backwards) does not really fly in Australia. The Kaurna people, who are the traditional owners of the Adelaide Plains and the lands on which I live, describe four seasons, but start about a month later than we traditionally believe (i.e. Wirltuti or Spring, starts in October, not September, and Summer or Warltati starts in January, not December). That makes a lot of sense to me, when you consider that our September weather is still often so cold we have continue to run the heating at night. The soil is still often not warm enough to plant tomatoes outside until mid-October.
That means it is possible to plant a crop of cool season plants in Spring, if you plan well.
I don’t plant cool season veggies that take a long time to reach maturity in Spring (i.e. no cabbages or anything that has to form a head), but it is still worth planning to grow quick growing cool season veggies that will fill the so-called ‘hungry gap’ between the Spring and Summer harvest. This Spring I am planting:
I ordered a batch of el cheapo bargain seeds from one of my favourite suppliers, Happy Valley seeds, when they had a $1 a packet sale. Even if a few of these run to seed when the warmer weather hits, it doesn’t really matter much. At $1 a packet, if I can harvest a quick crop I will have done well.
I still have a healthy crop of spinach, bok choy, coriander and dill that I am harvesting now in the greenhouse, and a small crop of celeriac in a wicking bed that I am keeping my eye on. That may not reach maturity before the hot weather hits – it was always a risk to grow it in a wicking bed, but I am hoping it will start growing lovely warty roots soon.
Planning for Summer
Pumpkins, pumpkins, pumpkins
I have a clear plan for my Summer garden this year, and it involves pumpkins.
Pumpkins, you say?
Pumpkins, pumpkins, pumpkins.
Also, beans, eggplants, chillies, zucchini, cucumbers, and tomatoes.
But mostly, pumpkins.
To be honest, I love growing pumpkins much more than I love eating them. They are so beautiful, have so many varieties, and are just fun.
This year, in addition to the old faithfuls (Butternut, Buttercup, Queensland Blue), I am going to try:
All ordered online from the Diggers Club, the home of funky heirloom pumpkins.
On the bean trellis I am trying several kinds of climbing beans. I enjoy eating fresh green beans more than I enjoy eating pumpkins, to be honest, but for some reason, growing pumpkins is just so much more fun. So most available garden space will be handed over to the pumpkins. I may try a melon in with the pumpkins, despite my annual vow to never grow melons again.
Everything else (tomatoes, eggplants, etc) will go in the greenhouse. I ordered the eggplant, cucumber, and tomato seeds from Diggers Club and they arrived in less than a week, along with a native finger lime and lemongrass plant that I ordered on a whim, just coz.
On one sunny day when I felt slightly less like death warmed up, I staggered out to the greenhouse, masked up to avoid breathing in any dust and crud, and planted some eggplant and tomato seeds. Then I crawled back into bed.
I’ve been a bit late to planting this season, because I’ve been working non-stop, seven days a week. Unfortunately, just at the best possible time of year to be out in the garden, I am also usually the busiest, work-wise. My little office overlooks my front garden, and I have been watching the Spring garden bloom away while I have been working away. It’s kind of a bummer, to be honest. But not having any money is also kind of a bummer, so I have sucked it up and looked forward to the time it all settles down and I can get back out there.
That time is now, before the next major project starts (any day now). Carpe diem, my friends.
This weekend I spent the first full day in six weeks out in the garden. There was a *lot* to do out there, from digging up the used brassica plants, to a heckton of weeding, to feeding and mulching, to planting. Let’s just say at the end of the day I was in some state of pain. Seven days a week sitting at a desk is not good conditioning for a day spent digging and weeding.
It was lovely though, to be outside in the sunshine, not thinking about the election of schmonaldschrump and focusing on what I can personally do to make my little patch of the world more beautiful and sustainable and healthy.
I tried to make some ruthless decisions about what to plant this year, based on experience about what has continually succeeded and failed in my garden over the past couple of years. I’m kicking out melons this year, and have carefully selected the type of eggplants, chillies, and capsicums. I tried to reduce the number of tomatoes but I have to admit I failed at that, big time. I’m trying to grow a lot more beans (both bush and climbing).
I am continuing the okra experiment, but it is not going well at all. After transplanting from the greenhouse, they are spindly and slow-growing. My husband thinks they will do better in the greenhouse as it is more humid, and he may be right, considering their natural habitat. I might plant some in the greenhouse and compare their growth to the open garden beds. I know that the cucumbers do not do well in my open garden beds, but in the greenhouse they do really well.
The cucumbers are getting even more greenhouse space this season – we love them fresh and pickled, but it does depend on the pickle recipe. I did both sliced and spears last season, and the spears recipe was not very tasty (waste of delicious cucumbers!). We still have some and I will get through them, but it makes me a bit cranky when I make a pickle recipe that is not as delicious as it should be. There is no excuse for a bad pickle, when they could be so good.
Zucchini, squash, and pumpkins are also getting generous garden space. Last year’s pumpkins were a bit average. I love growing pumpkins, but I grew an heirloom variety that did not do well and wasted a whole season and a heck of a lot of garden space (Wrinkled Butternut – way less productive than the regular tried and true Butternut and much less tasty – my recommendation is not to bother). This year I am still experimenting with an heirloom (Musque deProvence) but also growing the tried and true Kent, which always kicks butt in my patch. From now on, I will combine an experimental pumpkin with a trusted variety so if the experiment does not work out I will still have the trusted pumpkin in pocket.
This year I am growing:
Beans: Kentucky Wonder Wax (Climbing), Cherokee Trail of Tears (Climbing), Goldrush (Bush). When I spotted Cherokee Trail of Tears I knew I had to grow it. This was apparently the bean that the Cherokee brought with them from their homelands and carried it with them all along the Trail of Tears – heirloom seeds tell a story of the people that have grown it, and this is a devastating story of horror but also resilience. To grow it and save the seeds is to honour their resilience and history;
Cucumber: Marketmore, Dragon’s Egg, Jefferson, and another one I can’t remember the name of! I grow Marketmore every year, it is a real trooper of a cuke, good disease resistance and is prolific;
Tomatoes/Tomatillo: Black Cherry, Black Russian, Jaune Flamme, Costoluto Fiorentino, Azoychka, Tomatillos;
Zucchini: Tromboncino, Ronde de Nice, Cocozelle.
This year’s planting decisions were made based on: what we like to eat and the cuisine we mainly cook (Indian, Italian, Mexican, all vegetarian), what grows well in my garden, what I have space to grow, watering requirements, and what I have the time to take care of.
How about you – what are you growing in your patch this Summer?
Wicking Beds are gaining in popularity in Australia due to their water saving capabilities. They are designed to draw water from the reservoir at the base of the bed, rather than from top-watering, which reduces evaporation and saves water by up to 50% on conventional raised beds.
I have been interested in them for a while, but I don’t have the skills to build a wicking bed (nor the time, or interest to learn, frankly). When I researched them, I found instructions to build a wicking bed (no thanks), or a range of options to buy ready-made at very different styles and prices.
Finally, I chose a South Australian company selling via Facebook Marketplace. These are built from reclaimed timber, which was attractive to me as a more sustainable option than the fancier models using virgin materials. These aren’t as stylish as some of the models I have seen, but they are sturdy, sustainable, cheaper, and easy to use.
Wicking beds in unpainted state
I bought two beds to fit in the greenhouse, with the intention to grow tomatoes and eggplants. I was not happy with the eggplant crop last year, and while we had some good tomatoes last year I know we can do better.
Each bed is lined with thick plastic, and has a tap for overflow (pictured above). The box at the end is for storage (tools etc). The blue cloth you can see in the picture is used to stop the soil falling into the scoria once the bed is filled.
Preparing Wicking Beds
To protect the beds from sun and water damage and make sure they last as long as possible, the wood should be coated before use. You can choose oil, wax or paint. I chose to use exterior enamel paint, after first considering beeswax, boiled linseed oil, and decking oil. Exterior paint was the cheapest option, would last a long time, and as the wicking bed is lined and the paint was only used on the outside of the beds, was a safe solution. A light sand, and then three coats of exterior paint in pale eucalyptus (gloss) and they were ready to go. We had been painting our kitchen that week, so it was not much more effort to paint the wicking beds at the same time, and I think it was worth it.
Filling Wicking Beds
The base of the wicking bed should be lined with a medium such as scoria (volcanic rock) or perlite. I chose scoria as this was recommended to me by the company that built the wicking beds, and is more than half the price of perlite. However, it is much heavier, so be sure about where you want to place the wicking beds before you add it as you will not be able to move it again once you load it up with the scoria! I have accepted that these beds will be there forever now. I suggested to my husband that I could be buried in one of the beds when I die. Cheap funeral. He did not think that was funny. At all.
After placing the scoria (about five bags per bed), it is lined with the shade cloth, and then the soil is added. I used a mix of straw, compost, and potting soil, and watered in some soil wetting agent to make sure the soil does not dry out.
Watering the Wicking Beds
Each bed comes with a fill pipe in the corner. Using a hose, fill the bed through the fill pipe – too easy! You will know to stop if the overflow tap….overflows.
I have tomatoes and eggplants in the wicking beds. Each bed is also mulched to reduce evaporation. The beds comfortably fit four tomatoes and four eggplants each, as well as some basil. . The results have been remarkable. The tomato plants are enormous and healthy.
I am already planning to buy another wicking bed. I believe they have been worth the money. The wicking beds are 1.5 metres long and 60 cm wide, which is pretty large. These beds are not as pretty as some of the schmick wicking beds I saw online, but at easily half the price of many of the models I reviewed, I think they make up for it in utility. At a cost of $349 each (not including paint and filling), I would not say that these are cheap, but they are definitely not the most expensive option on the market either. These beds will help me achieve my dream of an almost self-sustaining vegetable garden, and as I age, I will be able to continue using my greenhouse easily without bending – this is becoming a more important consideration in my garden with every passing week, it seems. Cared for properly, they should last many years.
What else has been going on in the patch?
I have been out of action on the blog and in the garden due to a huge workload and project deadlines. While I have been ignoring the patch, it has continued to show the love with non-stop veggie production: broad beans, snow peas, spinach, and broccoli. When the kids ask me “what’s for dinner?” the answer over the past two weeks has been “something with broccoli” as we have had so much of it!
Our fruit trees are in full Spring production mode, including our Smyrnaquince tree, which is so exciting! Planted and espaliered a year ago, you can see it was in full flower in its second season (this photo was taken a few weeks ago – it is now covered in baby quinces). I love quince flowers and adore quince fruit, so am delighted to watch them develop. We also have plums, mulberries (heaps of them, finally!!), avocadoes (for the first time), apricots, limes, and a potentially huge crop of apples and pomegranates. I don’t want to get ahead of myself as there are a good couple of months to go yet, but if all goes well it will be a bountiful Summer and Autumn. I’m helping things along with regular watering and feeding with organic fruit tree fertiliser monthly.
In the colder weather, it is difficult to know what you can do out in the garden. If, like me, you have filled almost every conceivable space in the patch with cool weather plants (think brassicas, peas, and turnips), kept the weeds down, spread the cow manure, and trimmed the woody herbs – what else is left to do?
Honestly, it is a conundrum. Eyeballing the slow growing veggies is not making them grow any faster in this cold weather, although I do give them a good staring in the hope that it will nudge them along (spoiler alert: it doesn’t).
There are still a few more useful tasks I can do in the wintry weather to prepare for the busier seasons coming up.
Plan your Spring/Summer veggie patch
It may be cold outside, but the seed catalogues don’t know that! I’ve spent a lovely time ordering my seeds, taking advantage of a couple of EOFY sales, and an even lovelier time sorting them into my various seed collections (once a librarian, always a librarian). I now have all the seeds I will need to start raising seedlings in the greenhouse in just a couple of weeks’ time.
My husband, bless him, is also making plans for some building out there (new retaining wall, stronger trellising). Winter is a great time to make gardening plans, preferably with a hot cuppa in hand.
Keep on composting!
Even in the cold weather, the compost keeps on composting. It definitely slows down in the cooler months but turning it regularly and activating it with some chicken manure will keep it working its mojo. This weekend, I gave the compost bins a turn and was even able to pull some out of the bins, making room for more litter from the chook yard. I’m not going to fib, it was a chilly job, but worth it to keep the compost going.
Succession Planting
While most of the patch is planted up with the aforementioned brassicas, peas and turnips, we are still picking veggies from the garden. Just last weekend, I picked a whole container of greens, peas, and some onions for a fresh stir fry. With each picking, the garden is a little depleted, and although the weather is cool, I need to think about replanting what I have taken out. My tip for keeping a steady supply of something coming out of the patch is to ABP – Always Be Planting. To do that, I try to be either regularly raising seedlings in the greenhouse, or planting a cheeky row of greens, onions, or root veggies somewhere in the patch. Right now, I have baby turnips and carrots in the patch, and trays of leeks, onions, spinach, lettuce, bok choy, and silverbeet in trays in the greenhouse, to replace the veggies I pick over the next couple of weeks. I just planted out a heap of purple kohlrabi, which I may live to regret as it hardly ever forms decent bulbs in my garden – but my gardener’s eternal optimism makes me hope that this year will be different (if anyone has kohlrabi advice, please let me know in the comments).
This approach also helps to prevent the so-called Hungry Gap, that time in Spring after the brassicas and turnips are done and before the Summer flush.
Garden Wanders and Tidying Up
Although it’s cold, I do a quick wander around the garden a few times a week. I don’t have a great deal of choice right now, tbh, as our kitchen has been demolished and we are cooking and eating outside in our covered patio, fetching water for washing up from the tap. I see the garden daily from this quite chilly vantage point. It has allowed me to keep an eye on any weeds, pick out any that I see and toss them to the chickens and then go about my business of trying to feed four people using a single hotplate (fun times). As with most things, regular attention reduces the workload and sharpens your focus on what needs to be done.
I do this with my houseplants as well. Houseplants generally sulk through the Winter months: the combo of the cold weather, dry air, and indoor heating leads to dormancy and browning off on leaves. Add to that a lovely hit of dust from indoor construction, and I have some very sad plants. I often take a closer look at my houseplants though because I love them and I enjoy looking at them, and noticed my favourite Neon Diffenbachia was looking peaky on one branch. It kept flopping over, while the other canes stood up tall. On inspection, I found a small patch of scale, which I was able to scrape off before it became a big patch of scale. Now that I have noticed this issue, I will make sure to pay more attention to this lovely lady.
This weekend my nibling and nephew (aged 9 and 11) came to spend some time with us in the garden.
Gardening with kids is one of those things that, if you get it wrong, you can put them off gardening for life. Make it too boring or hard, and they may never want to do it again. Give them the opportunity to have fun while learning, and perhaps they will look back on that experience in a positive light. Even more hopefully, they may decide to take up gardening themselves one day.
We knew they were coming for a finite time, so my husband and I brainstormed a little about what we could get them to do. The activities had to be safe, first and foremost, and engaging enough to keep two kids occupied for a couple of hours. My garden is a large, working, productive veggie patch. While I do have flowers in the garden, and while I think it is beautiful, it is not really a place devoted to decorative plants. Kids often think ‘flowers’ when they think ‘garden.’ That might be disappointing for some kids. I did consider popping out to the nursery to buy some flowers for them to plant, but I ran out of time. These two kiddos know my patch pretty well though, so I thought they would be OK not planting flowers. In fact, they might have been disappointed if that is what I had suggested.
These were the easy, entertaining, safe, and helpful activities I had two curious kids help me with in the garden:
Watering the balcony garden;
Spraying aphids with potassium soap spray (non-toxic and easy to do);
Watering the greenhouse plants with liquid fertiliser (again, non-toxic – I did the measuring out and he did the watering);
Watering all the pot plants in the patio;
Planting broad beans and lettuce seeds;
Hand-pollinating cucumbers and eggplant;
Feeding the chickens and collecting the eggs (a perennial favourite with kiddos).
After watering – we used watering cans, not hoses (we have learned from experience!) – we spent time showing them how to hand pollinate different plants. They were fascinated that some plants need a male and female flower (cucumbers, zucchini, pumpkins) and some plants are buzz-pollinated (eggplant, capsicum, chillies, tomatoes). They loved feeling the spiky-soft cucumber leaves, and were interested in how droopy they were because they needed water. After we showed them how to buzz pollinate an eggplant with an electric toothbrush, and hand-pollinated the cucumbers, we looked around the garden at other plants that have different pollination methods.
I think it is so helpful for kids to see how the plants they eat are formed and grow. My nibling was fascinated by the cucumber plants, and searched out the baby cucumbers among the vines. They were very interested in the different types (I am growing three different varieties at the moment), and the fact that homegrown cucumbers have little spikes – so different from the smooth cukes they are used to from the supermarket.
After hand-pollinating the cucumbers (and a promise they could come back to see the growth later in the week), we moved on to planting seeds.
I chose to plant broad beans and lettuces with them because the seeds are so different. Broad beans are large (larger than a child’s fingernail) and lettuce seeds are tiny. Lettuces also often have funny names, and these were no exception: Flashy Trout Back and Great Lakes. It was a good experience for the kids to plant the broad beans as deep as their knuckles (or phalanges, as my nephew informed me, lol), and then lightly sprinkle the lettuce seeds on top of the soil and lightly cover with seed-raising mix. Planting seeds of different sizes helps kids to learn about biodiversity.
My kids are grown up now, so it was lovely to spend some time outside with young ones. I got to show them some of the crazy veggies I picked this morning, like the bowlful of Tromboccino zucchini. I had them guess why they were called that, and pretended to play it like a trumpet – uber daggy – but that is what crazy gardening aunties are allowed to do.
Tips for involving kids in the garden
Plan activities that kids can do – think about their age and abilities. If a child has a disability, plan activities they can manage, or make the task accessible for them.
Remember, safety first – don’t have them using power tools!
Choose activities that are fun and keep their interest. Plan specifically for the child you will be spending time with. Some kids might enjoy weeding, while others will complain mightily about that task. A couple of autistic kids I know (including my own) love weeding and will happily do that for ages.
Plan a list of short, active tasks with a quick reward or payoff. Kids (and tbh, many adults) will be more engaged if they can see the results of their activities – for example, watering, planting, or picking. I did not get them to pick zucchinis today because a knife was required for that task.
Stand back. While some tasks need you to closely supervise, it’s best to give them the space to try things independently. Because we chose safe tasks, we could take a step back and give them the space to do the tasks themselves.
Split them up. We had a 1:1 ratio of adults to kids. These are two well-behaved kiddos, however any kids can bug each other after a while. For some activities, we split them up. For example, one kid watered the balcony and another the greenhouse. That kept water horseplay to a minimum. For planting and pollinating, they came back together.
Don’t forget to break up the time with cold drinks, ice blocks or fruit, and chats. We always keep a stash of juice ice blocks in the freezer for when they visit.
Remind them to wash their hands after gardening and before eating and drinking if they have been in the garden. Soil is full of microorganisms that can carry nasties.
We love chilli so much, there is a whole shelf of our fridge dedicated to all things chilli: hot sauces, gochuchang, chilli pastes, chilli crisp, chilli oils, curry pastes, sriracha, salsas, chilli pickles, sambals…to be honest, it’s starting to take over other parts of the fridge now too. We also make our own chilli pickles.
We eat chilli with every meal. Our family has South East Asian heritage, so we grew up eating Indian meals very regularly, and at home we eat curries a couple of times a week, along with Mexican food at least once or twice a week. The other nights, we usually have Korean (spicy), Chinese (spicy) or Italian (spicy). We sprinkle hot sauce or drizzle chilli oil on our breakfast eggs or drop pickled chillies in our tomato and cheese toasties at lunchtime. There is not really a single meal that chilli does not touch. Possibly dessert, although if they still made those awesome chilli Tim Tams…(that’s a hint, Arnott’s).
For the past couple of years, a nearby town has hosted a chill festival each February, and for the past couple of years, we have attended. It was on again last weekend – and we rolled up once more, because we love, love, love chilli. It’s such a fun event, made more special this year because a friend was promoting her business, Uu-Mah-Mia at this year’s event. Her Chilli Crunch product is locally made in Alice Springs, and is fabulous.
Other great products there were our local favourite, Salt Gang (we love their Italo Crisp chilli oil, which is amazing on pizzas, pasta, on eggs – we go through it faster than any other condiment in our fridge), and this Victorian mob that grows and produces their own chillies and tomatillos to make hot sauces and Cowboy Candy and Toffee from jalapeños. OMG – it’s amazing stuff.
And when we got home from the Chilli Festival, after tasting multiple types of chilli products, buying more chilli plants and with chilli crisp, hot sauce, and Cowboy Candy in tow, my husband decided it was time to make chilli paste. He made a sambal from our homegrown Habaneros and Devil’s Tongue chillies, and it just about blew the roof off the house. We might need a biohazard sticker for the jar.
Chilli Varieties
In addition to the chilli fridge, we also grow a lot of chillies – at least twelve different varieties at last count.
It’s rare that I find a chilli I don’t enjoy, although it occasionally happens. I have a high tolerance for heat, but I don’t want a chilli that is so hot I don’t enjoy the flavour. I like a hot chilli, such as the Scorpion or Habanero, but I want the chilli to taste delicious as well. Conversely, I enjoy some milder chillies, such as the jalapeño or Curly Toenail, if they have a lovely bright or sweet flavour.
What I don’t like is a chilli with a flat, unpleasant, or dull flavour, no matter the spice level. Three that I have grown recently and found very unpleasant or boring are the Purple Maui (very hot but not very tasty), Dragon Roll (no heat, dull flavour) and the Mango (spicy, very prolific, but very unpleasant flavour). I’d go so far as to say I hated the Mango chilli and would never want it near my garden again. What was even more annoying was that it grew like crazy, was totally pest-resistant, and we were inundated with the little monsters. At least it was attractive. Mango and Purple Maui might be worth growing for their decorative fruit, I guess, if there were not other chillies equally pretty and with much better flavour.
My favourites this year have been (in no particular order):
Jalapeño – it’s a classic for a reason. Delicious, versatile, warm but not too hot, great for eating fresh, pickling, in salsas and curries, resistant to pests, and keeps on producing for months;
Curly Toenail – of course, the name is a winner, and the way it grows is so fun – long and skinny and curling up at the end. But it also tastes lovely, with a nice heat – but not too much. Versatile for Mexican and Indian food. Not super prolific, but enough to make it worthwhile. I overwintered this from last year’s Chilli Festival and it has kept on producing.
Anaheim – a mild, large chilli with a delicious flavour, great for Mexican food. For the flavour fans, not the heat freaks.
Devil’s Tongue – a lovely, hot, vibrant yellow-orange chilli with great flavour. Spicy, tasty, bumpy, prolific, one DT will heat a whole curry easily. Not very easy to find, worth seeking out from specialty suppliers.
Cayenne – just so pretty. What we think of when we think of ‘chilli’ – long, red, glossy, gorgeous. Warm and delicious. The classic chilli.
Habanero – a hot little monster, used to be considered the hottest in the world at 500,000 Scovilles (the heat measurement for chillies) until it was usurped by the new range of extreme chillies (i.e. the Carolina Reaper). But I prefer it to the extreme chillies because it has a lovely flavour and brightness, in addition to the heat.
Mustard Habanero – a variety of habanero, yellow-orange in colour instead of the darker red-orange of the traditional habanero. The fruit is also larger. Flavour and heat profile is similar, but I love it because it is so pretty as well.
Fresno – Similar to a jalapeño, but larger and fatter, and quite hot when it ripens to red. Delicious sliced up on a pizza, if you like your pizza with a little heat.
Scorpion – Hot, fresh tasting and quite juicy, pest-resistant, and prolific.
I won’t bother growing the Serrano, Siam, Bhut Jolokia, or Joe’s Long again next year – they were either just ‘ok’ or were too susceptible to pests to make the grade, in my opinion. Siam grew really well, but I didn’t enjoy the texture – it had a tough, waxy texture that I found a bit unpleasant, although it tasted alright. Joe’s Long was pleasantly flavoured and definitely attractive, but was not hot enough. And Serrano and Bhut Jolokia just attracted too many bugs. In fact, after I publish this, I am heading out to dump the last of these in the compost.
Growing Chillies
I grow almost all chillies from seed, purchased either from Happy Valley seeds or the Digger’s Club. I did buy a couple of plants from the Big Green Shed or from the 2023 and 2024 Chilli Festivals, including the Scorpion, Anaheim, Fresno, and Curly Toenail. The Chilli Festival is great for finding some unusual or hard to find plants.
I raise the seedlings in tubs in the greenhouse in August/September, pricking them out when they are a few centimetres high and hardening them off in single ten centimetre pots. Once they are well-established, I plant them out into larger pots.
Chillies are really easy to grow both in pots and in the garden bed. I mostly grow them in pots on my balcony and in the greenhouse. Next season, I will skip the greenhouse and put them on the balcony only – while they love the warmth of the greenhouse and grow prolifically there, in that warm, humid space they are more likely to fall prey to pests, namely aphids, white fly and the little jerk spider mite. On the open air balcony, they are less productive but are largely pest-free.
In my experience, some chilli varieties are more prone to pests than others. This year, the Bhut Jolokia (also known as the Ghost Chilli) and the Serrano have been most pest-prone – we have barely had a single fruit from these plants. The most productive and pest resistant have been the jalapeño – which is great, because it’s also the most useful – and the Scorpion. I bought that last year at the Chilli Festival, and it overwintered really well and then exploded into a profusion of pale orange and very hot little fruit. We find that half a Scorpion is lovely in a pasta dish; a whole Scorpion is good for something spicier, like a curry. Don’t pickle them though! I make a delicious lime and fresh chilli pickle that usually requires green chillies (jalapenos or other fresh green chilli). I ran out of the full quantity for a double recipe, and topped up with ripe Scorpions. I think my husband burned a hole in his oesophagus.
Chillies are fairly un-fussy plants: grow in full sun in a decent sized pot (although they will not really complain if the pot is not very big), pop some slow-release fertiliser for veggies in the pot, and give them a regular liquid feed every two weeks. If you are growing them in a pot, make sure to water them daily so they don’t dry out.
You can overwinter your favourites at the end of the growing season. In March, cut them back hard, and leave them in a sheltered place. Then wait for them to re-shoot in Spring, and then repot with fresh potting mix. If you don’t want to give them that space, save the seeds from a ripe chilli by drying them out on a plate, and save in an envelope, and plant out again next year. I will be doing that with my Anaheim, Jalapeño, Fresno, Cayenne, Curly Toenail, Mustard Habanero and Habanero, and Devil’s Tongue this year.
Is there a chilli variety that you love to grow – or one that you really dislike? Let me know – I am always looking for new chilli plants to try!
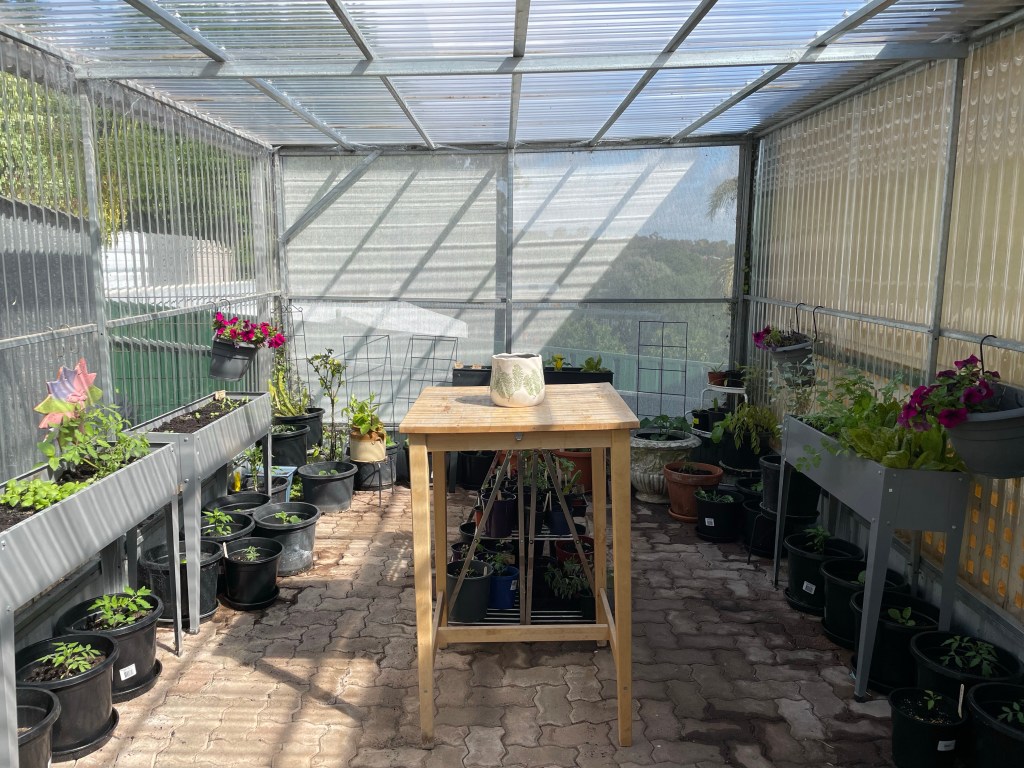
I’m a lucky duck – I have a big veggie garden and a greenhouse. The greenhouse was converted by our builder from an old tool shed. He removed the old tin sheets, and replaced with poly sheeting and white shade cloth for ventilation. Doing this mini-renovation on the old shed, which we were going to remove anyway, saved us about five thousand bucks and has created a much more sturdy and larger greenhouse than we could have had if I purchased a flat pack model online (which was my original intention). Thank goodness for innovative builders!
I love it. I mean, I love it. I can’t wait to go outside every morning to water it and see what has happened inside over the past 24 hours. I’m obsessed.
I grow almost all edible plants in the greenhouse, with the exception of a few ornamental cuttings I am striking. Aside from that, it is an oasis of fruiting plants and vegetables, especially this time of year.
But it’s also been a bit tricky to learn how to manage the greenhouse, compared to growing outside in the open. Last year, which was my first Summer with the greenhouse, I was inundated with aphids and it was not a fun time. I left it too late to treat them, and I could not stop the invasion. This is because I was used to growing outside in a very large space, where a bug here or there doesn’t matter much. Everything balances out. But in the greenhouse, which is its own little micro-climate, things don’t balance in the same way. It’s warm and humid, and the aphids and white fly just love it. Predators do come in, but they are also busy outside, where there are more flowers and other plants for them to work away on.
This year, I have been much more proactive. I keep yellow sticky strips in the greenhouse all year round, which has helped to keep the population of whitefly down. I have noticed that the whitefly attract the aphids, so keeping their population down helps. When I water, I keep an eye out for both, and if I see them I either squish them or give them a quick squirt with the hose as soon as I see them. If they still proliferate, that is when I spray. I found out the hard way that the recommended homemade soap spray (water mixed with dishwashing detergent and a little cooking oil) is fine in the open garden, but burns and kills plants in the greenhouse, due to the soap and oil hitting tender leaves in an environment of high heat and humidity. In addition to the hosing and squishing, I have been trying a homemade spray made of chopped tomato leaves soaked in water. That has been quite successful.
Soak tomato leaves in a bucket of water for several hours, up to overnight. I just filled the bucket with a many leaves as I was willing to pull off the tomato bushes and then topped up with water, then left to soak. Strain and pour into a spray bottle. I have found that the aphids steer clear, when combined with hosing them off pretty regularly.
The other pests I have struggled with recently is spider mites. These little buggers are much worse than aphids, as you can’t see them with the naked eye and you don’t notice you have them until the leaves of your plant start to show the telltale signs of damage (silvery leaves, tiny webs). I hate these jerks. They are really hard to get rid of and they spread quickly. A soap spray is the recommended treatment, but as I have already mentioned, in a greenhouse that is problematic. I have to choose a very cool day and hope for the best, or if the plant is too far gone, put it in the green bin.
Watering the greenhouse
Watering the greenhouse is a big job. While you can get away with skipping a day or two in the patch in hot weather, you can’t in the greenhouse. It is several degrees hotter in there, and everything is in containers. They must be watered or they will die. Simple as that.
When there were fewer pots in the greenhouse, I could manage with a couple of watering cans. Now, I need to use a watering gun and hose. We spent about $40 on a strong steel and brass watering gun, with the hope that it will last quite a few years, and now watering takes about ten minutes instead of half an hour – and I am not lifting heavy cans of water.
Be careful with saucers in the greenhouse as well. I have found that in they are susceptible to algae growth due to the higher humidity. While saucers may be preferable when growing containers on balconies or patios, I have mostly removed them in the greenhouse.
Pollination
Pollinators do come into the greenhouse – it’s not hermetically sealed (so do birds, and I think some other critters, judging by a couple of overturned pots I have found). I have spotted native bees and hoverflies in there several times. But my open veggie patch is a pollinator’s paradise, thanks to all the herbs and flowers I plant, and my mini-meadow. So the greenhouse gets short shrift from pollinators.
Things still fruit in there, but I needed to think about how I can increase pollination rates. I have came up with a few solutions.
The first is hand pollination of cucumbers and zucchini. This is easy: just strip off the petals of a male flower (the one without the swelling at the base) to expose the pollen filled stamens, and poke it in the female flower a couple of times. Some people are much fancier than me and use a paintbrush to delicately remove the pollen from the male flowers and dip it into the female flowers. You can do that if you like. I’m a little less refined than that.
The other thing I do is mimic the buzz/wind pollination process for tomatoes and related plants. Tomatoes are self-fertile but require wind or the visit of a busy bee to buzz alongside them and shake their pollen loose. The greenhouse is not as exposed to wind, and while bees do visit, most of them are buzzing around the borage outside. To address this, I have a cheap electric toothbrush (sans brush). I have taped up the poky end so as not to accidentally stab myself, and I gently buzz the top of each tomato flower. I don’t want to brag, but I can see the little puffs of pollen shake loose when I do this, so I think I am easily as good as a bee at this job.
Of course, it’s hard to explain to others. Like when my sister called and asked what that buzzing noise is. And I had to admit what I was actually doing. She said it sounded like the world’s most boring porno.
With all this effort, is it worth having a greenhouse?
I’m not going to lie, a greenhouse is an expensive exercise. Firstly, there’s the expense of building it in the first place. Then there’s the set up. This can be minimised in a couple of ways. We did this by converting the old toolshed, as I mentioned, and by recycling pots and shelving. We did buy some shelving and raised troughs online, but we have also sourced a lot of pots, shelving, and stands from our local Buy Nothing Group on Facebook. That has reduced the cost significantly, but there are still other expenses, such as the potting mix, water, and time. I can’t pretend it’s not a luxury, or that my five cucumbers yesterday couldn’t have been purchased yesterday for much cheaper than it cost me to grow them. However, once the greenhouse is built, and all the pots and shelves are in place, they can be reused almost indefinitely. The cost of the set up is spread over years, and the value will be maintained. The ongoing expenses of potting mix, water and time will remain.
Growing plants from seed also reduces the amount of plants I buy in seedling form, which does save money – so long as I resist spending too much on seeds. I can grow almost anything from seed in just a couple of weeks, which is amazing. 95% of the veggie garden this season has been grown from seed. That is so exciting to me, as a gardenerd and obsessive.
Aside from the fun, I can see the difference in plant size and productivity between plants in the greenhouse and in the open garden. I have cucumbers I planted in the greenhouse and in the garden at the same time. I am picking cukes from the greenhouse while the cucumbers I planted in the garden are still having a little chat with each other about whether they might possibly consider growing another millimetre this week. I have eggplant flowering in the greenhouse, while the eggplant in the garden are having a little stretch. It’s not that they can’t grow, it’s just that the weather is still so unpredictable this season, they are not sure why they should. Whereas the greenhouse, with its stable lovely warmth is just so conducive to growth.
So is it worth it? For me, it is, simply because gardening is my main hobby and great pleasure in life. Some people love cars, or music, or movies, or art. I love plants. If I had all the free time in the world, I would spend it in the garden. In real terms, it is a relatively cheap, and certainly an active and healthy hobby. I just wouldn’t suggest a greenhouse unless you have the space, money, and time to spend troubleshooting the challenges that can arise.
After a month of busyness, both personal and professional, this was the first weekend I had two full days off, and I chose to spend them doing my favourite thing in the world: gardening.
On Saturday, I spent the whole day in the backyard, tidying up the veggie patch and pottering about in the greenhouse, repotting plants and generally having a lovely time. After a month barely spending an hour or two a week in the garden, it was a blissful time. I downloaded hours of gardening podcasts (local and international), and listened to various gardening experts natter on about compost and fruit trees and rainfall. I picked four cucumbers, half a dozen beets, some spuds, a handful of green beans, and an armful of rhubarb from the monstrous rhubarb plants that appear to be untameable. Nothing could have been better.
The only way to demonstrate the size of the rhubarb is to show my hand on a rhubarb leaf. That is one leaf, and my hand. Admittedly, I have fairly small hands, but even so. I picked about two kilos of rhubarb, cooked it up with some blueberries and frozen cherries, and made a pretty great rhubarb cordial. And I still have half of it in the fridge. Lawks, as Nanny Ogg would say. I only picked some of what is out there. Might have to make some jam next weekend!
Rhubarb leaves are toxic of course, so I don’t feed them to the chooks, but it is great for compost. Not sure why, but my compost always speeds right up when I add rhubarb leaves to it (I also find that pineapple bark and cores are spectacular for compost, but I assume that is the bromelain).
I planted out a bunch of seedlings I have been raising in the greenhouse: sunflowers, okra, and more capsicums. I think the veggie patch is officially full. It is starting to look lush and gorgeous, with a mix of beautiful green veggie plants of all kinds and flowers such as cosmos, petunias, alyssum and calendula creating a colourful display and attracting the bees. Sunflowers are on their way, which is always very exciting to me – I just love their cheerful colour.
We are almost at that exciting time of year when all the veggies we eat come straight out of the garden. That is my favourite, favourite time of the year. Last night’s dinner was soft tacos, with black beans and jalapeños, roasted potatoes, beets and broccoli, served with cucumbers and tomatoes. Everything but the broccoli and tomatoes came straight from the garden. I heard a podcaster today say that there is a name for the flavour profile of food from your garden: ‘smugness.’ Classic.
Gherkin cucumbers growing like the clappers
Speaking of smug, check out these flower trusses on the Riesentraube tomatoes in my greenhouse:
Riesentraube Tomato trusses
This prolific flowering is a feature of the Riesentraube, according to the tomato bible, Amy Goldman’s The Heirloom Tomato. She writes the Riesentraube (which is a cherry tomato) “sets fruit on large sprays bearing as many as three hundred flowers and buds, although only 10 to 20 per cent of the blossoms bear fruit.” It’s certainly the most prolific flowerer of the tomatoes this year, although I’ve got to be honest, the crazy flowering is not why I grew it. I just liked the name: Riesentraube. It means “a giant bunch of grapes” in German. I picked it out of a seed catalogue for that reason alone.
Today (Sunday) I determined to tackle the much less fun, but important task of tidying up the front yard in time for Christmas. We are hosting this year, so it did have to be done. The Spring flush is over, and many plants required deadheading and generally tidying up, especially a Pineapple Sage bush that had never been trimmed and was nearly as tall as me. I actually don’t mind these tasks, but if it is a choice between playing in the greenhouse or deadheading the roses, I know what I would pick. Happily, as I had both days this weekend, I could do both!
Salvias and sages should be trimmed annually, but ideally not this time of year – that is a bit naughty of me. Wait until Autumn preferably, and give them a really good haircut then. I just did this one because it was looking very ratty and it has not been too hot and dry this season. Don’t be like me – give salvias a prune in May, not December.
I even started weeding the pavers – now that is a job that is bloody boring and no one should have to do. But I did make a start, and I have to say, it already looks much better.
I rewarded myself for my hard work by spending a last half an hour planting some seeds: dill, zinnia, bush beans, more zucchini (Rondo de Nice – a funky round zucchini that is just fun to grow), and some cos lettuce. Yes, I know I said the patch was full, but these are just in case. And just because. I’m sure I’ll fit them in somewhere.
It was a stunning morning in the garden today – lovely and warm, sunny, and not too hot. I had exactly two hours to spend in the garden before a family event, so I spent time feeding the pots in the greenhouse with liquid fertiliser and planting out more of the seemingly endless capsicum seedlings I have grown from seed. I also sprinkled organic snail pellets around the patch. This is the first year I have ever had much of a problem with snails. Usually, a bit of snail damage does not bother me, but they have been really having a go on new seedlings. A new organic iron-based pellet has been released on the market. It’s not harmful to other critters, and breaks down to harmless iron in the soil.
I have also been diligent keeping up with the mulch in my front and back gardens. Organic mulch decomposes over time. I topped up the bare patches that have broken down since the start of Spring with chopped sugar cane mulch. Keeping up the mulch is critical at this time of year as the weather warms up and because it has been incredibly dry all Spring. According to the long range weather forecast broadcast on ABC radio last week, the dry weather will continue for the rest of Spring. This is not good news for we gardeners, especially those of us that do not have a rainwater tank. I have been watering my garden since September, as we have a lot of fruit trees that need regular water through blossoming and fruit set. Mulch is necessary to maintain all that good work and save water.
I threw a couple of handsful of fertiliser under each fruit tree – in the Summer growing season I try to do this each month.
Walking around the garden mulching, hand weeding, and feeding, I can keep an eye on changes in the garden.
This week I noticed baby quinces growing (above – so exciting), the Violet Queen beans have started to flower (so pretty), and I picked two Pepinos and four cucumbers already! Cukes are my garden white whale – I think I built the greenhouse just so I could successfully grow cucumbers.
Violet Queen bean flowers
I’m also happy to see that the squash and pumpkin plants I planted about six weeks ago (probably too early, tbh) have almost all survived the snail onslaught and are starting to put on some lovely new growth. I usually have good success with pumpkins and limited success with squash (the mysteries of life!) but I really hope this year that I do well with both – I love steamed summer squash with butter or olive oil and a little salt. I could eat just a big old plateful of them for dinner and be very happy! The squash plants look as good as I have ever managed, so fingers crossed!
Capsicums (Sweet Peppers)
Last year’s capsicums
This year I am growing a lot of capsicums (in the US, known as sweet peppers). I am mostly growing the long Italian-style capsicums, used primarily for frying and cooking, rather than the salad-style capsicums (although I am growing one sweet salad variety, Sweet Chocolate, which I like because it grows a lovely dark brown when ripe).
I personally find capsicum really easy to grow from seed, and more fun because you have access to more interesting varieties than the standard Californian Wonder you can buy from nurseries. However, I do have a greenhouse, so that does make it easier to grow them from seed.
If you do want to try it, use seed-raising mix in trays (I like the Yates seed-raising mixbest – but it is pricey – and I also think the Seasol brand is good), and plant as many seeds as you think you will need, plus a few extra. Water well and keep damp until seedlings emerge. Keep the seedlings going with a weak liquid feed every week or so, and then when they are about half as tall as your iPhone, prick them out gently and replant them into pots to harden off. Keep them watered and fed weekly until you are ready to plant them out into the garden – or you can grown them in larger pots. They will be happy in pots throughout the growing season. Just make sure to grow them in a warm, sunny spot and keep them well fed.
For chillies – just do the same! I find chillies fruit earlier and more prolifically than capsicums though, so don’t be surprised if you find you have chillies well before your capsicums have even flowered – they are related, but chillies seem to have started their run before capsicums have tied their shoelaces.
What to do in the garden with the time you have this week
I am flat out this week! It’s deadline time for the next two weeks – so I will barely have any time in the garden – as with today, I will be carving out a set period to spend in the garden, and that will be that.
If you are like me, and time-strapped, here are some suggestions for what to do in the garden this week with limited time.
If you have an hour
Plant some seeds for Christmas giving, or pot up some seedlings ready for Christmas giving. It may almost be too late to plant seeds ready for Christmas, but you could have time, depending on what you are planting. I have had some plants growing from seed for quite a while with certain people in mind, ready for Christmas giving. I also have had some growing from cuttings. They are almost ready to pot on for giving in four weeks. I am keeping an eye out for a lovely pot to give the plant. Caveat: I love to receive plants, but I also understand that not everyone does! I have chosen these plants and the receiver carefully, based on what I know they will enjoy.
If you have 2-3 hours
Feed and water – but keep an eye on the weather. You should not liquid feed your plants if the temperature will exceed 25 degrees C, as it can burn your plants. Choose a cooler day, and a liquid fertiliser for your plant type (there are many different types on the market, including organic). It can take some time, which is why I do it on a weekend when I have a little more time to go back and forth with my two 9L watering cans. I find it is a great way to get up and personal with your plants.
If you have 4-5 hours
Then you are living the dream! If it was me, this week, I would be deadheading roses and other flowering bushes to keep the flowering flush going, hand-weeding, mulching, and choosing some showstopper pots and plants for a front door and patio Christmas display.
Unfortunately, I don’t have that time this week – but hoping to carve some out in a couple of weeks to do these jobs!