Weekend gardening jobs, 20th February 2021

It’s been a busy week in the garden, because I gave myself a week off (exciting). As I work for myself, it’s not often that I get a full week off, but I managed it!

As it’s still Covid times, I took the week off around home, but it was still very lovely. I spent a few mornings and afternoons in the garden, and also visited some outdoor gardening places, such as the botanic gardens, the Digger’s shop in the botanic gardens, where I bought plants and garlic to plant in a few weeks time, and the annual Chilli Festival, where I bought chilli plants and a local plant nursery and bought more house plants. So I guess it was kind of a gardening holiday in which I spent the majority of the time either gardening or thinking about gardening.

House plant mania

I looked around my house this morning and realised that I have a crazy amount of house plants. There is at least one house plant in almost every room. In the lounge room, there are about twenty. On the kitchen window sill I’m striking four new plants. In my office I have six plants to keep me company while I work.

It might be time to slow it down a little, because they actually take a fair bit of time to care for.
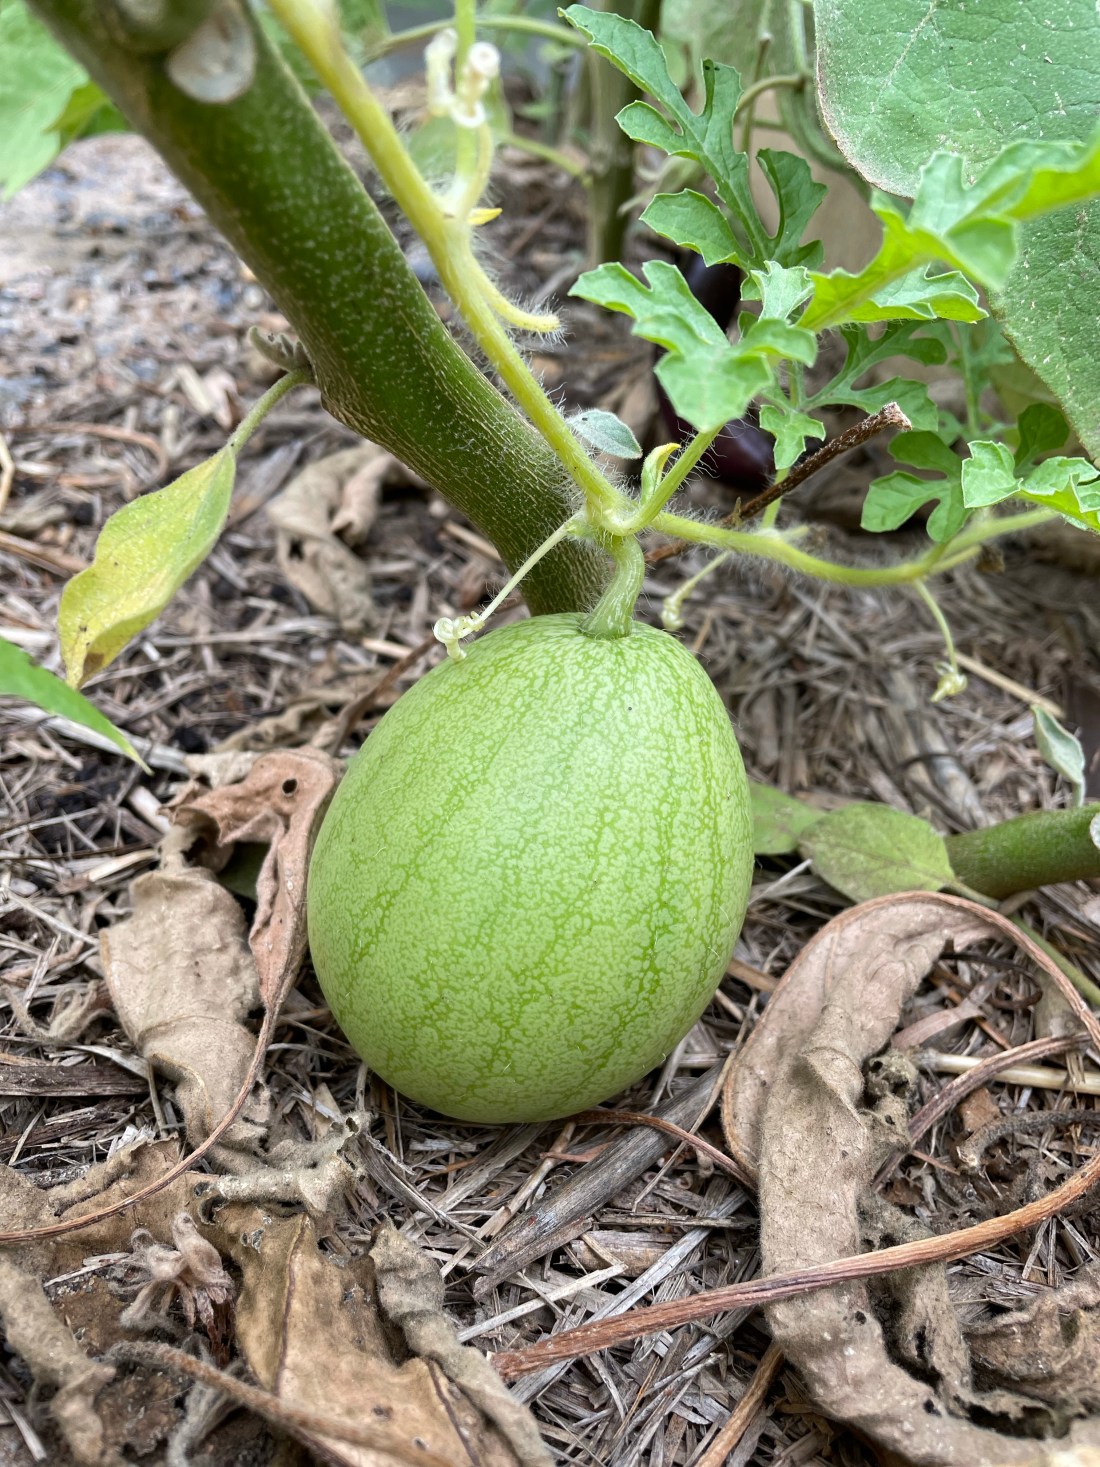
Melon success

Pocket melon

I have been trying to grow melons since…always. I have never successfully grown any melons, despite having grown pumpkins with success for a number of years. This has always puzzled me, since pumpkins and melons are closely related. I could not figure out what I was doing wrong.

To be honest, I can’t figure out what I am doing right either, but whatever it is I’ll take it! I’m growing two varieties: Pocket Melon, and Golden Midget. Both are smaller varieties. Golden Midget is a golden melon with red flesh, that grows to 2.5kg at the largest, making it a relatively small melon. The Pocket Melon is a much smaller melon, grown for its intense fragrance more than its flavour. I’m growing them more as an experiment than anything else – if I can break the melon curse then it will have been worth it.

Golden Midget

Preparing for next season

Right now we are picking an abundance of veggies from the garden, and most of our meals are made almost entirely from the veggie patch.

Spinach fettuccine with spicy eggplant sauce – we are cooking from the garden every night

But I have an eye to next season, and I have already bought all the seeds we need for a full Winter/Spring veggie patch. In addition to the usual suspects (broccoli, cabbage etc) I want to try some different veggies to shake our diet up a little. I have been listening to an American gardening podcast called Backyard Gardens, which has me thinking about some different options. I recommend listening to it, with some caveats: the seasons are obviously the opposite to ours, the pests they deal with are generally non-existent in Australia, and the male host has a habit of sometimes speaking over the female host (she’s great). I still listen because I enjoy listening to the female host, and I like learning about what other gardeners are doing, even if it’s across the world.

They suggested growing collards. These are a vegetable that I have never eaten or grown. They are a brassica, related to cabbage and kale. The seeds are not easy to find in Australia, but I found some sold by Happy Valley Seeds in NSW. I’m looking forward to growing and learning to cook collards, which the Backyard Gardens hosts say are tastier than kale (I also like growing and eating kale).

Happy Valley Seeds also sell a wide range of other heirloom and hybrid seeds, so I bought most of next season’s seeds from this site. In addition to the collards, I bought lots of lettuce, purple and orange cauliflower, cabbage, onions, carrots, kohlrabi, turnips, silverbeet (chard), spinach, two types of kale, and broccoli seeds. I am using my heat mat to raise the seeds inside, so I can plant them out in March once the Summer veggies are done.

I bought the heat mat as part of a propagation kit from Diggers Club last month. The whole mat costs $50, but I bought it as part of a kit for $100 (the kit also included a seed tray with cover, seed raising mix, jiffy pots and some other gear). The electric mat supplies gentle heat to the bottom of a seed tray and speeds up propagation. Instead of waiting 7-10 days for seeds to come up, they pop up in three days! I already have seedling pots of silverbeet and spinach ready to plant out once they add their mature leaves, and I have onions, kohlrabi, and collards popping their little heads out now. I love this thing, and just wish that I had bought one years ago. I ordered my kit online from Diggers Club, but you can find them online from other places, as well as the separate components from the Big Green Shed.

What to do with all that stuff you grow

  • Freeze it: shred zucchini, carrots, beetroot, and freeze in one cup portions in snap lock bags. For the zucchini, squeeze out as much water as you can first. To freeze green beans, spread on a tray lined with baking paper, then place in a bag once frozen. To freeze silverbeet, kale or spinach, just chop it and freeze it in bags, and either use it from frozen, or thaw it.
  • Preserve it: make jam, chutney, passata, ketchup, or preserve it;
  • Give it away to friends, family, co-workers, or put it on a Grow Free cart;
  • Bake it: there are so many recipes online for muffins, cakes, brownies, etc using veggies, including vegan options;
  • Cook it: we are not vegetarian but right now we are eating mostly vegetarian food or less meat meals, because we just have so many veggies to eat! We certainly eat our five a day at the moment (admittedly sometimes in chocolate beetroot brownie form, which probably doesn’t count).

Gardening jobs, late Summer 2022

Pumpkin hanging on a trellis

After a relatively cool Summer (for Southern Australia), and a sudden burst of torrential rain caused by a tropical cyclone up North, we have had a spell of hot, humid days. This is not weather I enjoy. I love the heat, but I don’t love humidity. The constant blanket of moisture in the air feels oppressive to me.

That being said, I am glad to finally have some heat in the garden. The cooler weather has not been great for Summer fruiting veggies. We live in a hilly area, and this means that we are always a couple of degrees cooler than the Adelaide plains. We need some warmer weather for the tomatoes, eggplant, and beans to get going. These have finally started to take off, and we are generally cooking from the garden each night. There is at least something to nab out of the garden everyday to throw into a meal, whether its eggs from the chooks, a zucchini, some little Lebanese eggplants, carrots, beetroot, or onions. Tomatoes are just coming on now, and we have basil, chillies and mini capsicums on the balcony.

My husband has been building a new trellis for the grape vine and the passionfruit vines. He has been slowly building new trellises for all the fruit trees in the backyard, which is a big job. Somehow we have managed to plant five fruit trees, four berry canes, and five vines in our backyard, as well as our veggie patch. I think that probably qualifies the backyard as a food forest.

Before building the trellis, we picked our first bunch of grapes from our two year old vine. I planted the grape vine because my youngest loves grapes and looks forward to grape season every year. I like grapes, but I would rather eat a new season apple any day. However, I have to say that I felt crazily excited about picking the first bunch of grapes – more than I felt picking the first apples from our trees. They tasted really good.

Succession Planting

I’m experimenting with succession planting. After my great success with carrots this year, I have started planting fresh seed about every 8 weeks, with the goal of always having a supply of fresh carrots. I’m doing the same with beetroots and trying to do the same with onions. I haven’t had to buy a carrot or onion in months. You could argue that carrots and onions are dead cheap, and why would I bother taking up garden space for them?

Organic carrots and onions aren’t cheap, firstly. Conventionally grown carrots and onions are, but the veggies I grow are organic, no sprays, fungicides, or pesticides. They taste amazing. A homegrown carrot tastes special. Also, I can grow interesting varieties, like purple or yellow carrots, little round Paris Market carrots, and lovely long red onions.

Of course, I can do this because I have the space to continually grow rows of carrots and onions.

Late Season Planting

Summer is heating up late this year, so I am taking advantage of the late season warmth to throw in some extra veggies (in addition to the carrot and onions). I have thrown in some extra cucumber and zucchini seedlings to try to get some extra zucchini and cukes before the cooler weather kicks in.

I decided to spend a bit of money, and bought a propagation kit, which included an electric heat mat so I can start seeds for Autumn inside. I have started spinach and chard (silverbeet) now, to see how the heat mat works and familiarise myself with it, and because it is a bit early to grow out brassicas ready for planting in March. If that works well, I will grow all my caulis, cabbages, broccoli and kale from seed using the heat mat inside, and then plant out in March before the cold weather sets in.

Re-potting House Plants

My amazing Philodendron, that I bought as a tiny plant several years ago, has grown into a giant monster. It can no longer stay upright in its own pot or its cover pot, which means it is time for re-potting.

When I buy house plants, I generally buy the smaller, cheaper plants, and then challenge myself to grow them into the big plants that cost a bomb. I have grown a ten dollar Fiddle Leaf Fig into a lovely $80 specimen (the secret – lots of light and keep the leaves free of dust). I do this partly because I don’t like paying a hundred bucks for a plant, and also because I love the challenge.

When you buy a house plant, you should leave them in their existing pot, and place them in a cover pot. Keep them in their existing pot until they grow too large and need re-potting. You should be able to tell when the time is right.

Before re-potting

This philodendron had clearly outgrown its existing pot.

Original pot on the left, new pot on the right

I looked around in my potting shed for a new pot to upsize the plant. You can see how much bigger the new pot is than the old one: easily three times the size. This is because I don’t intend to re-pot this plant again for a long time.

I gently removed the plant from its existing pot, and soaked it in a bucket of water for a while. You can see how root-bound it is. Being root-bound is not a bad thing for house plants. Most house-plants prefer being root-bound, which is why re-potting should only occur once the original pot is clearly much too small.

I gently teased the roots out, being careful to make sure the soil from the roots fell into the bucket of water. I placed a layer of good quality potting mix into the base of the new pot, and then placed the plant in the bottom. Then, I tipped the water and soil from the bucket back over the plant. I did this because the plant is healthy and happy. The healthy microbes and fungi from this plant’s existing soil should be saved as much as possible and returned to it. If the plant was sick, I would not have done that.

I topped up the pot with fresh potting mix, making sure it was as upright as possible.

Now I just need to find a big enough cover pot – the basked I had it in is too small! Such a shame, I hate shopping for pots…

A beginner’s guide to indoor plants (by a beginner)

My grandmother always had a couple of pots of African violets on her windowsill, and a cyclamen in her house. My mother has always had a maidenhair fern in the bathroom and a jade plant in an interesting pot at the front and back door (for luck). But you may have noticed that lately every dude with designer facial hair and a one gear bicycle has a fiddle leaf fig in his house.

Indoor plants are cool now.

I have a number of indoor plants (because cool, see), but although I am an old hand at outdoor gardening, I am a total noob when it comes to indoor gardening. These are the plants I have right now:

  • Sedum or Jellybean plant x 2;
  • Pincushion Cactus (Mammillaria),
  • Pachyphytum hookeri;
  • Pachyphytum kimnachii (my favourite succulent – it looks like some sort of crystalline growth on a cave floor);
  • Fiddle leaf fig;
  • Fatsia;
  • Philodendron;
  • Aspidistra elata;
  • Peperomia variegated;
  • Diefferbachia;
  • Pothos (Devil’s Ivy).

I have also killed several plants, including several Freckle Faces for some reason. These are basically a weed, so killing these takes true talent.

These are my tips for keeping my houseplants alive and looking healthy and happy:

  • Watch the plant. My philodendron, Albert, was initially in the lounge room. He was miserable. His leaves would start off beautifully, then start to crisp around the edges and turn brown and wilt. I was not overwatering, and he was fed a slow release fertiliser for pot plants, so feeding was not the problem. I realised that light was the problem. Philodendrons have enormous leaves almost the size of small plates, which I figured were for photosynthesis. I moved Albert to our sunroom, which as the name suggests, is a much lighter room. Albert is now my most beautiful houseplant, happily unfurling leaf after gorgeous leaf. Every time I go out to the sunroom, I have to stop and look at him.
  • Keep an eye on light and temperature. The plants that I have killed have died due to either a lack of light (one bathroom is too dark) or too much heat (the other bathroom has a north facing window and plants placed there quickly crisped up and died). I have a houseplant in my office at work, and I bring it outside regularly for some sunlight and fresh air. I know my colleagues think I am slightly cracked because about once a week I take my little ‘friend’ for a walk outside. Houseplants can also die due to to overexposure to indoor heating, so I generally do not keep houseplants in my living area, where we have a fireplace going in Winter, and ducted cooling in Summer. The exception is one Sedum (Jellybean plant), which sits over the kitchen sink. It seems to be fine because the moisture from the sink keeps the air nice and moist.
  • Clean the plant. Houseplants collect dust. The dust clogs up the plant and prevents it from properly photosynthesising. I clean my houseplants every few weeks with tepid water to which I have added a few drops of olive oil. The olive oil helps to shine big houseplant leaves. Obviously, I don’t clean succulents.
  • Think about water. I only water my houseplants with bottled spring water. This seems like a wasteful choice, but in fact the spring water is a waste product in my house, because my eldest daughter buys water when she is out and then doesn’t drink it all (yes, I have suggested a thousand times that she takes a reusable water bottle, but she rarely remembers). I started using her leftover water on my plants rather than tip it down the sink, and discovered that my houseplants seemed to thrive on it more than tap water. My non-scientific guess is that it doesn’t have chlorine in it. Of course, if my daughter ever does listen to me and starts taking her own water bottle, then I will have to think about what else to do. Filtered water would be an option, or leaving tap water out for several hours for the chlorine to evaporate might also work.
  • Don’t overwater. This is the most commonly cited instruction for houseplants, but it is true. My plants get watered when I have a spring water bottle to empty. I check the dirt in the pot with my finger. If my finger comes back dirty, I move on to water a different plant. For my succulents, I have some cool German made self-watering pots that I found at the Melbourne International Flower and Garden Show. Pretty swish.
  • Feed. I use a slow release fertiliser especially designed for pot plants. I don’t feed the succulents.
  • Use cover pots. I don’t repot pot houseplants, generally speaking. I take the original plastic pot and place it inside an attractive cover pot. That way, I disturb the plant as little as possible. If the plant turns out to need repotting down the track, I will do it, but so far I have not had to do that. The only plants I have repotted are the two succulents pictured below. I re-potted them into the self-watering pots, which came with a special potting medium.
  • Elevate, if possible. If the plants are not on a shelf or a table, I use plant stands. I have found some el cheapo stands from K-Mart ($5-$8), and from Mitre 10 for $14. I personally think this keeps the plants looking good and helps keep them pest-free, but that could be confirmation bias on my part. I don’t see any pests on my plants, so those bug-fighting plant stands must be working…

That’s it – that’s all I know. I’m still learning, but since I killed the last Freckle Face last year, I have managed to keep all my houseplants alive and most are now starting to look pretty great.

One last note on plant choice: I’m kind of a tightwad. I don’t buy expensive mature plants. My most expensive plant was about $15. I figure the point and fun of a plant is to grow it. I understand if you are a decorator or designer, it might be worth spending a lot of money on an expensive mature plant, but that reason doesn’t exist for most people. If I were to buy Albert as he is now, he would probably cost about $65. I think I paid about $12, then helped him to grow into the beautiful plant he is now. I had much more fun doing it this way, plus every time I look at that plant I feel like a proud Mama. I just wouldn’t feel that satisfaction if I had bought him that way.

Also, imagine if you killed a $65 houseplant? You’d feel pretty f$#!ed off.

Twelve bucks: I feel the pain, but not so much.